Recording a lesson is not the same as teaching one. In a classroom you can see confusion on a face and slow down. On a recording you cannot, so everything has to be decided in advance — what is on the screen, how long it runs, and whether a student watching on a phone at 11 at night can actually follow it.
This is a complete setup for a Mac, written for teachers and tutors rather than video producers. None of it needs paid software.
First decide what the student is looking at
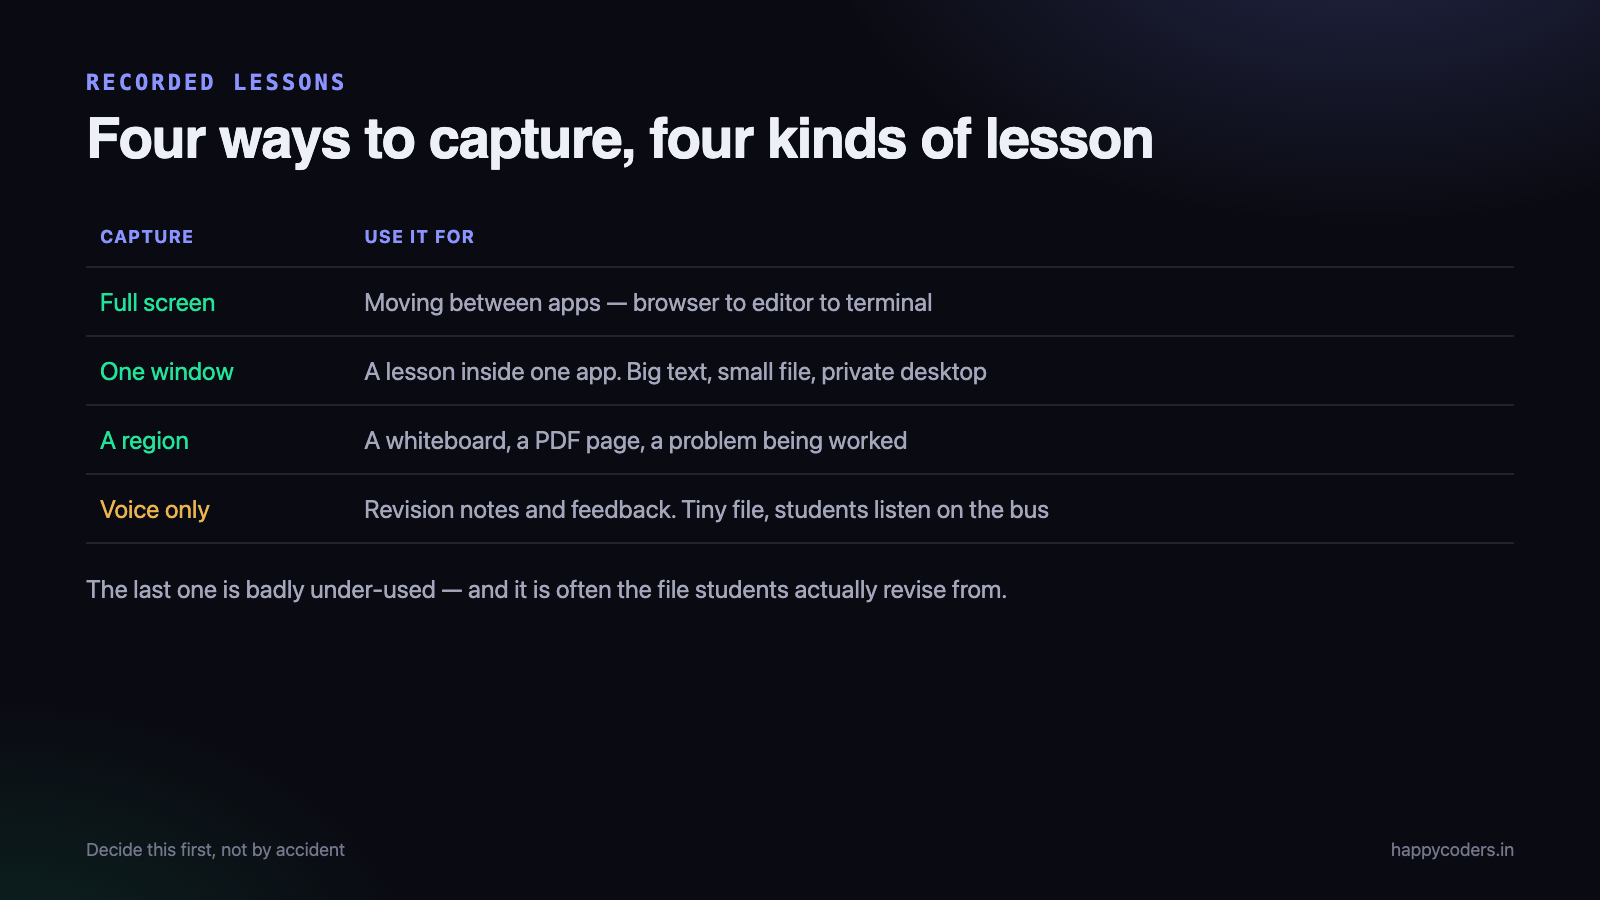
This is the decision that matters most and the one most people make by accident. There are four sensible choices, and each suits a different kind of lesson.
- Full screen — for anything where you move between applications. A computer-science lesson that goes from a browser to an editor to a terminal needs the whole screen, because the movement itself is part of what you are teaching.
- A single window — for a lesson inside one application. A spreadsheet class, a design tool, a presentation. The text stays large, the file stays small, and your desktop stays private.
- A region of the screen — for a whiteboard, a PDF page, or a problem being worked through. Capturing only the working area keeps the student’s attention where you want it.
- Voice only — for revision notes, a summary, or feedback on submitted work. An audio file is tiny, students can listen on the bus, and it takes a fraction of the time to make.
That last one is badly under-used. A five-minute audio summary after each written lesson costs almost nothing to produce and is often the file students actually revise from.
Being heard clearly matters more than being seen clearly
Students forgive a slightly soft picture. They abandon a lesson they have to strain to hear. If you improve one thing, improve the audio.
The room, not the microphone
A quiet room with a laptop microphone sounds better than an expensive microphone in a room with an echo. Hard walls, tiled floors and large empty rooms create reverberation that no setting fixes afterwards.
Three free improvements, in order of effect:
- Get closer. Speaking 30–40 cm from the microphone instead of a metre away roughly halves the amount of room you hear.
- Add soft things. A curtain, a bed, cushions, even a bookshelf. Recording in a room with fabric in it makes an audible difference.
- Turn off the fan and close the window. A ceiling fan is a constant hiss that the listener stops noticing but keeps getting tired by.
A cheap headset beats a good laptop
If you record regularly, a wired headset with a boom microphone is the single best inexpensive upgrade, because it keeps the microphone the same distance from your mouth no matter how you move. Consistency matters more than quality.
Avoid wireless earphones for recording where you can. They are convenient, and their microphone quality is usually poor because the same connection is carrying audio in both directions.
Recording the computer’s own sound
If your lesson includes a video, an audio clip or a pronunciation example, you need the Mac’s system audio in the recording, not just your microphone. Recording both at once — your voice and the computer’s output — means the student hears the example exactly as you played it.
Check this before your first real lesson. A recording where the example is silent is a lesson that has to be made again.
Setting up the screen for a student, not for yourself
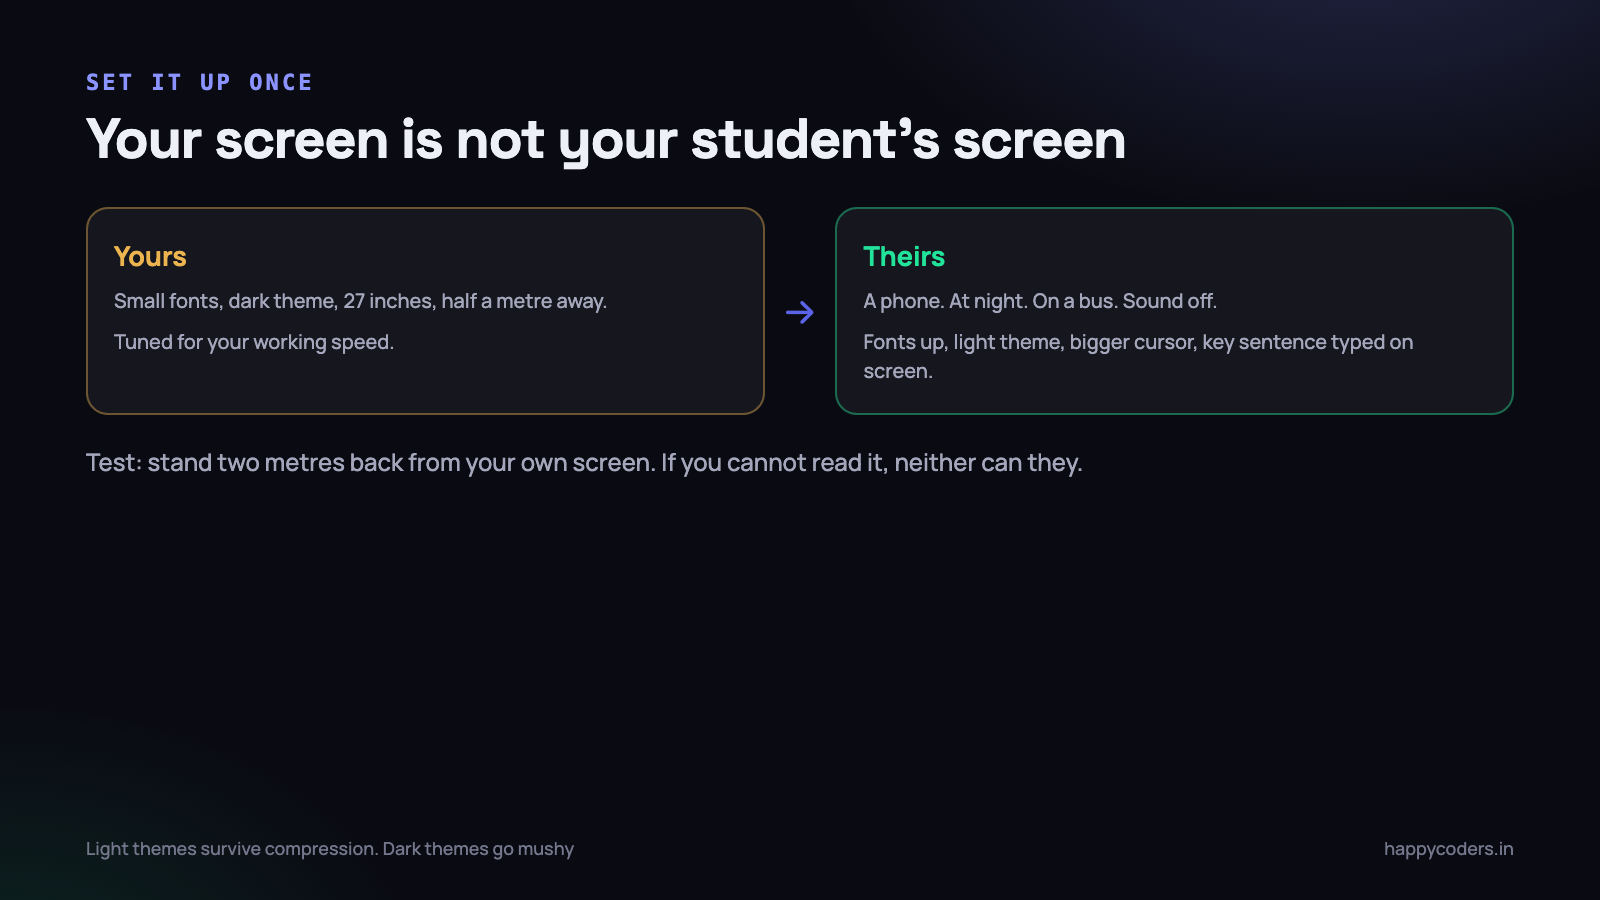
Your screen is set up for your own working speed. A student’s screen is smaller, further away, and often a phone.
- Increase the font size everywhere. In the editor, the browser, the PDF reader. A good test: stand two metres back from your own screen. If you cannot read it, neither can a student on a phone.
- Use a light theme for teaching. Dark themes are comfortable to work in and compress badly, which makes small text mushy in the recording. Light backgrounds with dark text survive compression better.
- Increase the cursor size in System Settings. On a recording the pointer is small and students lose track of where you are pointing.
- Turn on Do Not Disturb. A message preview from a parent or another student appearing mid-lesson is both distracting and a privacy problem.
- Close everything unrelated. Other tabs, your email, anything with another student’s name on it.
- Hide the bookmarks bar and any browser extension icons that are nobody’s business.
Make a separate user account on the Mac for teaching, or a separate browser profile. It takes ten minutes once, and after that every recording starts from a clean screen without you having to remember anything.
How long a recorded lesson should be
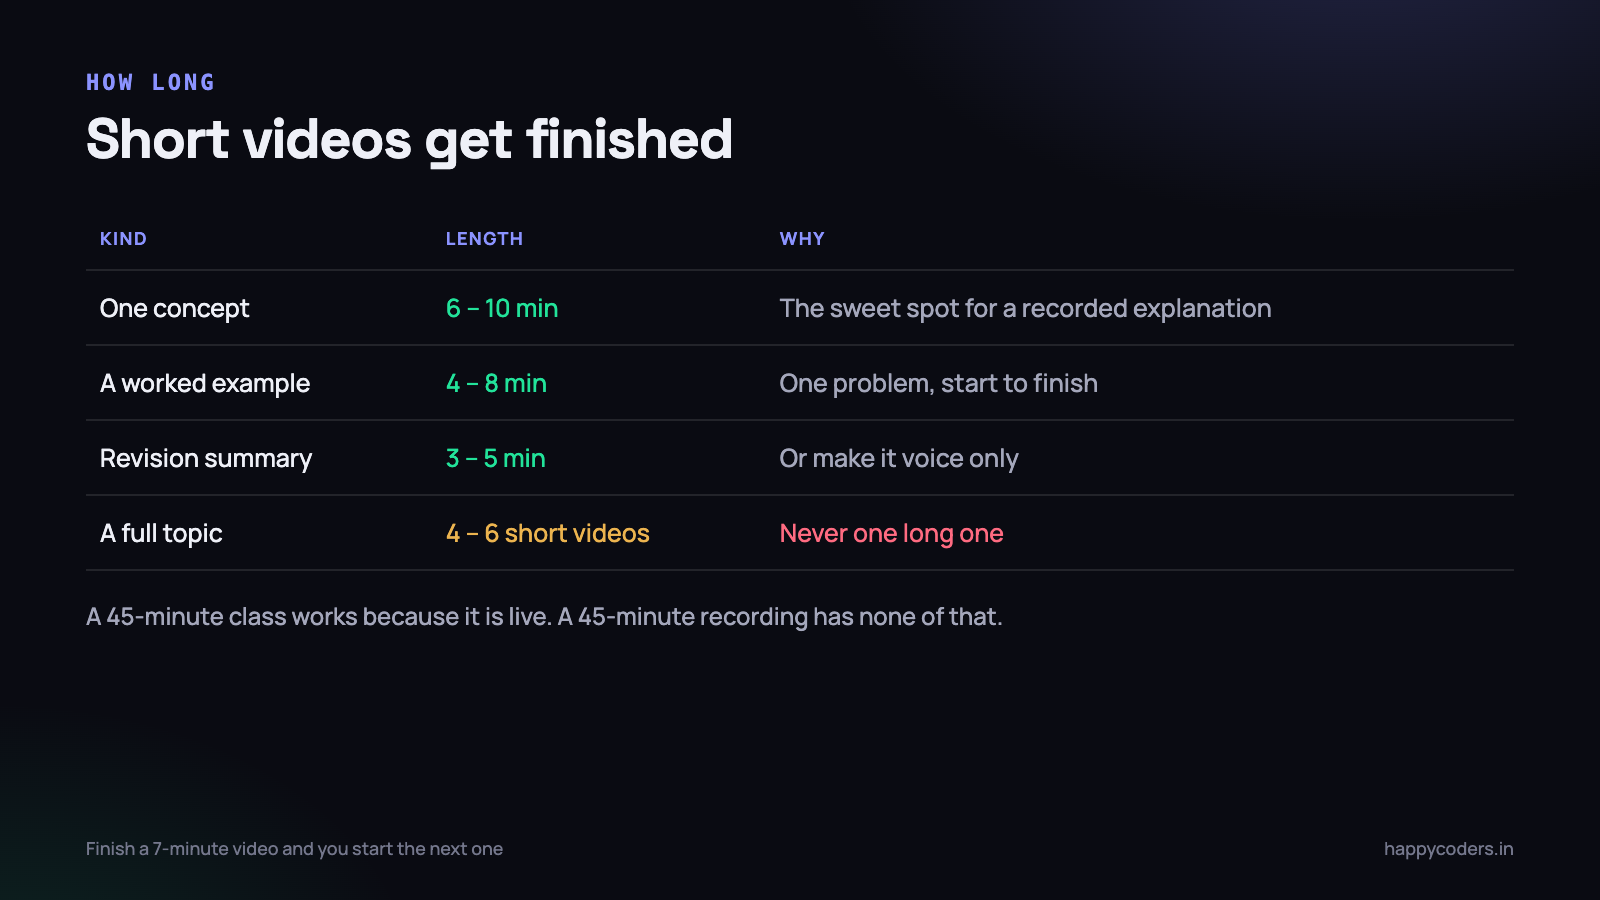
Far shorter than a classroom period. A 45-minute live class works because it is live — there are questions, pauses, and social pressure to stay. A 45-minute recording has none of that.
- One concept: 6 to 10 minutes. This is the sweet spot for a recorded explanation.
- A worked example: 4 to 8 minutes. One problem, start to finish.
- A revision summary: 3 to 5 minutes. Or make it audio only.
- A full topic: split into 4 to 6 short videos, never one long one.
Splitting a topic has a real effect on whether students finish it. A student who finishes a seven-minute video feels they achieved something and starts the next one. The same student abandons a forty-minute video at minute twelve and does not return, because restarting means finding their place again.
It also makes your life easier. When one explanation turns out to be unclear, you re-record seven minutes, not forty.
Say what is coming, then say what happened
Because a recording cannot read the room, it has to carry its own signposting. Two habits make a large difference.
Start with the map. Twenty seconds: what this video covers, what the student should already know, and what they will be able to do at the end. Students who are in the wrong video leave immediately, which is what you want — better than them watching confused for six minutes.
End with the summary. Thirty seconds restating the two or three things that mattered. This is the part students replay before an exam, so make it clean enough to stand alone.
Between the two, narrate what you are doing rather than only doing it. “I am going to select this column first, because the formula needs it before it can total” teaches. Silently selecting the column does not.
Record in sections, always
Do not try to record a whole lesson in one take. Record each part separately — introduction, explanation, example, summary.
The difference is not only about mistakes, though that matters: a stumble costs you one minute instead of twenty. The bigger gain is that each section is separately reusable. The explanation of a concept you teach every year gets recorded once and used for three years, while the worked example changes each term.
Over two or three terms this builds into a library. Teachers who record in sections end up with something they can assemble new lessons from. Teachers who record forty-minute single takes end up with forty-minute files that can only ever be used as they are.
Recording feedback for one student
This is the use that teachers discover last and then use most. Instead of writing three paragraphs of comments on a submitted assignment, record two minutes with the work on screen.
It takes a third of the time, and it carries something writing cannot: tone. “This part is genuinely good” lands very differently spoken than typed, and a correction delivered in a warm voice is far easier for a struggling student to hear.
- Capture the region with the student’s work in it, not your whole screen — nothing else of yours is in frame.
- Keep it under two minutes. Two things done well, one thing to fix.
- Say their name at the start. It is the difference between feedback and a form letter.
- Send the file, or a link, individually. Never in a group where other students can see it.
One caution worth taking seriously: a recording of a named student’s work is personal information. It goes to that student and their parent, and nowhere else. Keep these in a separate folder from your lesson library and clear them out at the end of the term.
Make it usable without sound
A large share of students watch with the sound off — on a bus, in a shared room, late at night. A lesson that only works with audio loses them.
Two habits fix most of it, and neither takes extra time:
- Put the key sentence on screen. The formula, the definition, the rule — typed, not only spoken. If the one thing a student must take away exists only in your voice, half of them will not get it.
- Show what you are talking about as you say it. Highlight the line, circle the term, select the cell. The visual should be able to carry the meaning on its own.
If you upload to YouTube, its automatic captions handle the rest and are worth switching on — they are imperfect, but for a student who cannot use sound they are the difference between a usable lesson and a silent video. Reading through them once and fixing the subject-specific words takes a few minutes and makes them genuinely reliable.
Things that quietly ruin a recording
- Talking while scrolling quickly. Scrolling is the hardest thing for video compression, and fast scrolling turns text to mush at exactly the moment the student is trying to read it. Scroll slowly, or jump in steps and pause.
- Reading from a script in a flat voice. Notes are good, a full script usually is not. Students disengage from reading-aloud immediately.
- Long silences while you think. Stop the recording, think, and start again. Silence feels far longer on playback.
- Pointing with your finger at the screen. The student cannot see your hand. Use the cursor, and move it deliberately.
- Forgetting to check the first thirty seconds. A whole lesson recorded with the microphone muted is a lesson taught twice.
- Names and marks on screen. Another student’s work, a marks sheet, an email thread. Check before you share, not after.
A routine that takes five minutes
Before every recording, the same short checklist. Written down, stuck near the desk.
- Do Not Disturb on, unrelated windows closed.
- Font sizes up, light theme on.
- Record ten seconds, play it back, confirm you can hear yourself clearly.
- Know the first sentence you are going to say.
- Know the three points this video covers.
That last one is the difference between a recording that takes eight minutes and the same content taking twenty-two.
After the recording
Keep the files organised from the first week, because by the third term there are two hundred of them. A simple scheme works: subject, class, topic, part number. Physics-10-Refraction-02.mp4 tells you everything without opening it.
Keep the originals. Storage is cheap and re-recording a lesson is not. If you share compressed versions with students, keep the full-quality file somewhere for the day you want to reuse a section.
And check one recording a term on a phone, at phone brightness, with phone speakers. It is how most of your students actually watch, and it is the fastest way to find out that your font size is too small.
The short version
- Choose window, region, full screen or voice-only based on the lesson.
- Fix the room before worrying about the microphone.
- Record system audio too if you play anything.
- Bigger fonts, light theme, bigger cursor, clean screen.
- 6 to 10 minutes per concept. Split topics into parts.
- Open with a map, close with a summary.
- Record in sections and build a library.
- Check the first thirty seconds before recording the rest.
HappyRec is a free screen recorder for macOS with screen, window, area and voice-only modes, and it can capture the Mac’s own sound alongside your microphone — which is the setup described here, without a subscription.