You record a ten-minute walkthrough, go to email it, and it is 1.4 GB. So you compress it, and now the text is a grey smear the moment anybody scrolls.
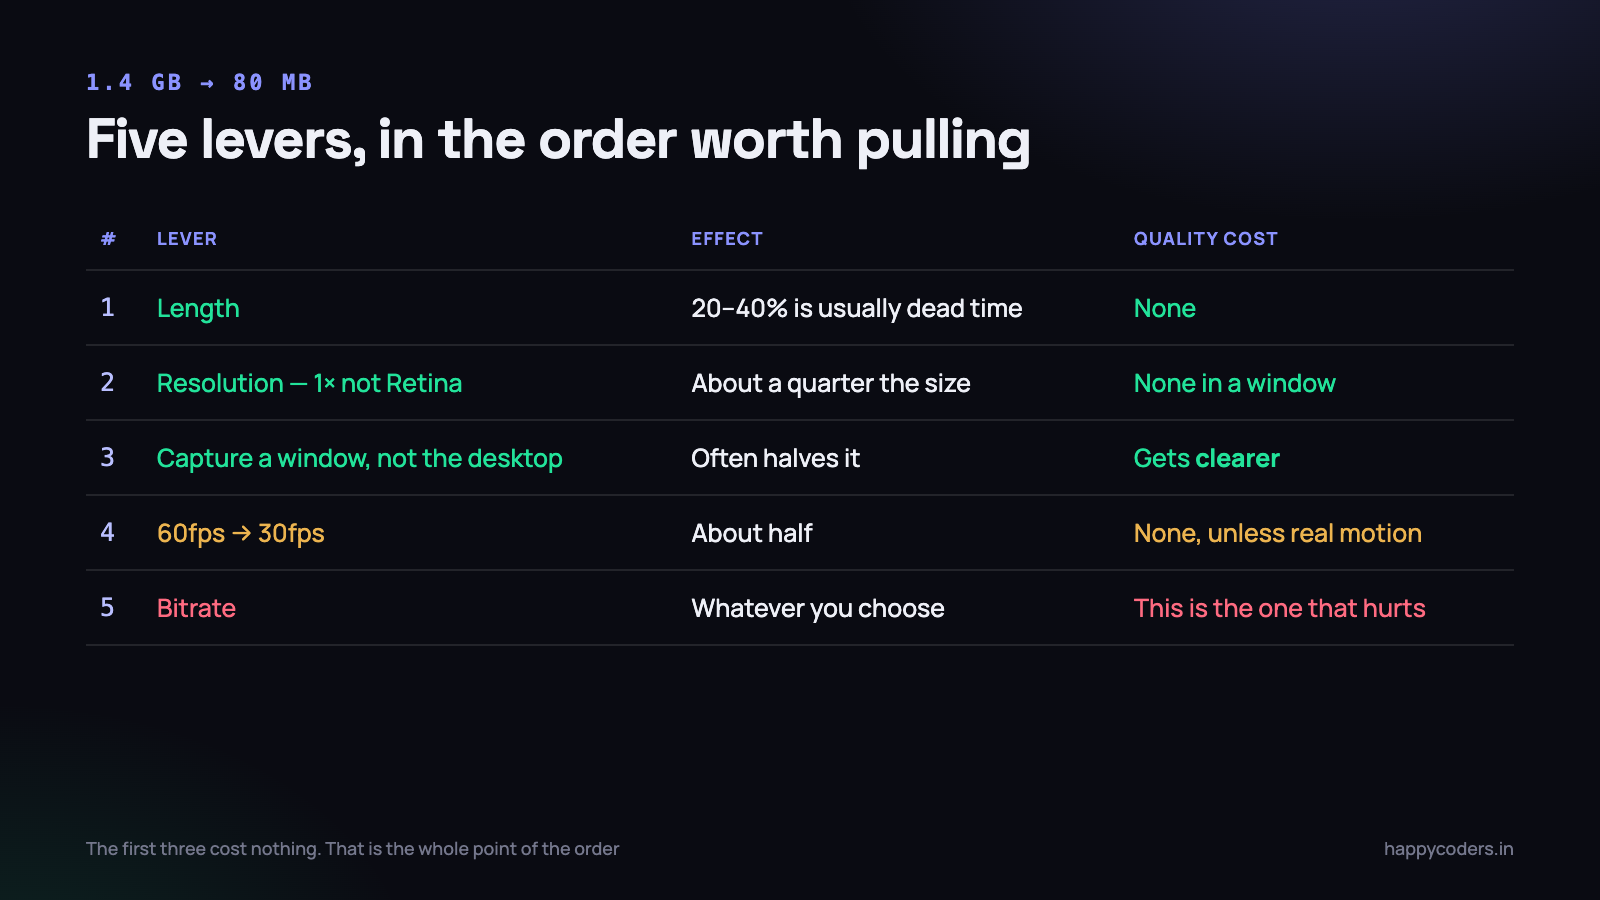
Both problems come from the same thing: screen recordings behave unlike any other video, and the usual advice — “just lower the quality” — is exactly the wrong lever to pull first. There are five levers, and they are not equally useful.
Why a screen recording is so big
A camera video changes a little bit everywhere, every frame. Compression handles that well because the differences are small and spread out.
A screen does the opposite. Nothing changes for four seconds while somebody reads, then the entire frame changes at once when they scroll. The encoder is idle and then, for a few frames, asked to do an enormous amount of work.
On top of that, screens are full of hard edges and small text, and compression throws away fine detail first. On a face that is invisible. On 12-pixel text it is the difference between readable and not. So screen recordings need more data than camera footage at the same resolution, not less.
Lever one: length
This is the biggest one and almost nobody uses it, because it does not feel like a technical fix. File size is roughly bitrate multiplied by duration. Cutting a twelve-minute recording to seven does more for the file than an hour of encoder settings.
- Cut the opening. The first thirty seconds are usually you getting settled.
- Cut the loading. Stop the recording while a page loads and start again.
- Cut the search. Every “let me just find that…” is dead weight.
- Split into parts. Three four-minute files are easier to send, easier to watch and easier to replace than one twelve-minute file.
Most recordings have twenty to forty per cent of pure waste in them. Removing it costs nothing in quality, which is not true of any other lever here.
Lever two: resolution
This is the biggest technical lever, because it multiplies. Halve both dimensions and you have a quarter of the pixels, needing roughly a quarter of the data for the same visual quality.
The specific thing that matters on a Mac: a Retina display is captured at twice its logical size. A screen you think of as 1440×900 is really 2880×1800 pixels. Recording that natively produces a genuinely sharp file and an enormous one.
Recording at the logical size instead — 1× rather than 2× — gives a file about a quarter the size that is still perfectly readable in a browser window, because that is the size the viewer was looking at anyway.
For anything that will be watched in a window rather than full screen — which is most tutorials, demos and bug reports — 1× is the right default, and it is the single easiest way to make recordings shareable.
Lever three: what you capture
A 27-inch display is several times the area of the application you are actually demonstrating. Capturing the whole desktop when one window would do means most of your file is wallpaper and menu bar.
- Window capture — for anything happening inside one application. Smaller file, larger text, and your other windows stay private.
- Area capture — for a part of a window: a form, a chart, a code block. The smallest option of all.
- Full screen — only when moving between applications is part of what you are showing.
Switching from full-screen to window capture often halves the file on its own, and it usually makes the recording clearer at the same time, which no other setting does.
Lever four: frame rate
Screen recordings do not benefit from 60 frames per second the way games do. A cursor moving and text appearing are perfectly smooth at 30, and doubling the frame rate roughly doubles the size for something almost nobody notices.
The exception is genuine motion — an animation, a game, a video playing inside your app. There, 60 is worth paying for.
Going below 30 is a false economy. At 15 the cursor jumps between positions and a viewer following a demonstration loses track of where it went.
Lever five: bitrate, and why it is last
Bitrate is the lever everybody reaches for first and it should be close to last, because it is the one that actually costs you quality.
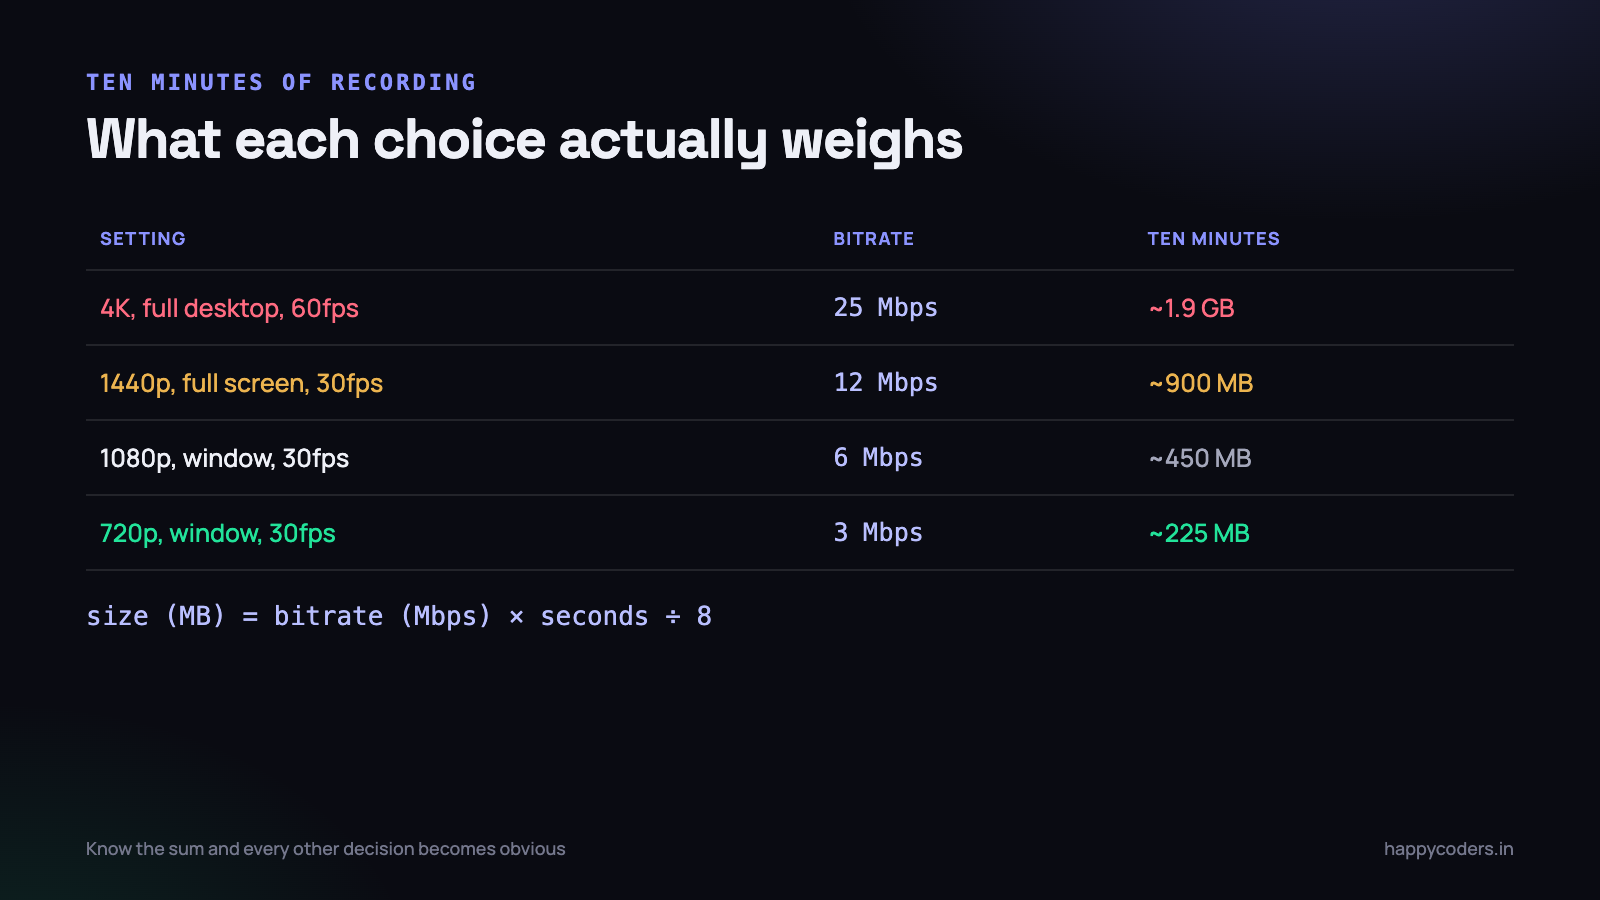
If you do set it, screen content needs more than camera footage at the same resolution. As rough starting points at 30 frames per second:
- 1280×720 — 2.5 to 4 Mbps
- 1920×1080 — 5 to 8 Mbps
- 2560×1440 — 10 to 14 Mbps
And here is the part that catches people out: a lower bitrate looks completely fine on a still page. The damage only appears the moment somebody scrolls, which is exactly when the viewer is trying to read. So never judge a compression setting on a static screen.
What about the audio?
Almost nothing. Audio is a rounding error next to video, and people spend real time on it anyway. Speech at 128 kbps is more than enough; 96 kbps is fine. An hour of that is about forty megabytes against several gigabytes of video.
The one place audio settings matter is a voice-only recording, where there is no video at all. Then the choice is between a compressed format for sharing and an uncompressed one for editing — and for a spoken summary that nobody will edit, compressed is the obvious answer and a fraction of the size.
Work down the list, in order
A 1.4 GB recording usually becomes about 80 MB with no visible loss at all, and almost all of that comes from the first three levers.
- Is it too long? Cut the dead time. Split it into parts.
- Is it at Retina resolution? Re-record at 1×, or scale it down.
- Are you capturing the whole desktop? Capture the window.
- Is it at 60 frames per second? Drop to 30 unless there is real motion.
- Only now, lower the bitrate — and test by scrolling.
Notice that the first three cost nothing in quality. That is the whole point of the order.
The arithmetic, so you can predict it
It is worth knowing the sum, because it makes every decision above obvious rather than a guess:
size (MB) = bitrate (Mbps) x seconds / 8

  8 Mbps x 600 s / 8  =   600 MB   (ten minutes at 1080p)
  3 Mbps x 600 s / 8  =   225 MB   (same length at 720p)
 25 Mbps x 600 s / 8  = 1,875 MB   (same length at 4K)
Two things follow. First, duration is as powerful as any setting — which is why length is the first lever, not the last. Second, resolution matters mostly because of what it does to the bitrate you need, not directly. A 4K recording is not big because of the pixels; it is big because those pixels demand five times the data rate to look right.
This also tells you when to stop optimising. If a recording needs to be under 25 MB, the sum says you have about 330 seconds at 600 kbps or 110 seconds at 1.8 Mbps. At that point the honest answer is not a better setting — it is a shorter recording or a link instead of an attachment.
Do not re-compress twice
Every lossy encode throws information away permanently. Encoding a recording, editing it, and exporting again means the second pass is working from the first one’s compromises. Small text is where this shows first, and by the third generation it is obvious.
Two practical consequences:
- If it will be edited, capture it at high quality and accept the large intermediate file. Storage is cheap; a re-record is not.
- If it will not be edited, encode once at delivery settings and stop. Recording at maximum quality and then compressing for delivery is a wasted generation if nothing happened in between.
Trimming is the exception worth knowing. Most tools can cut the start and end without re-encoding at all, which is instant and completely lossless. If your editor offers a “trim without re-encoding” option, that is why it finishes in a second while a normal export takes minutes — and it means cutting the dead time off a recording costs you nothing at all.
Match the file to where it is going
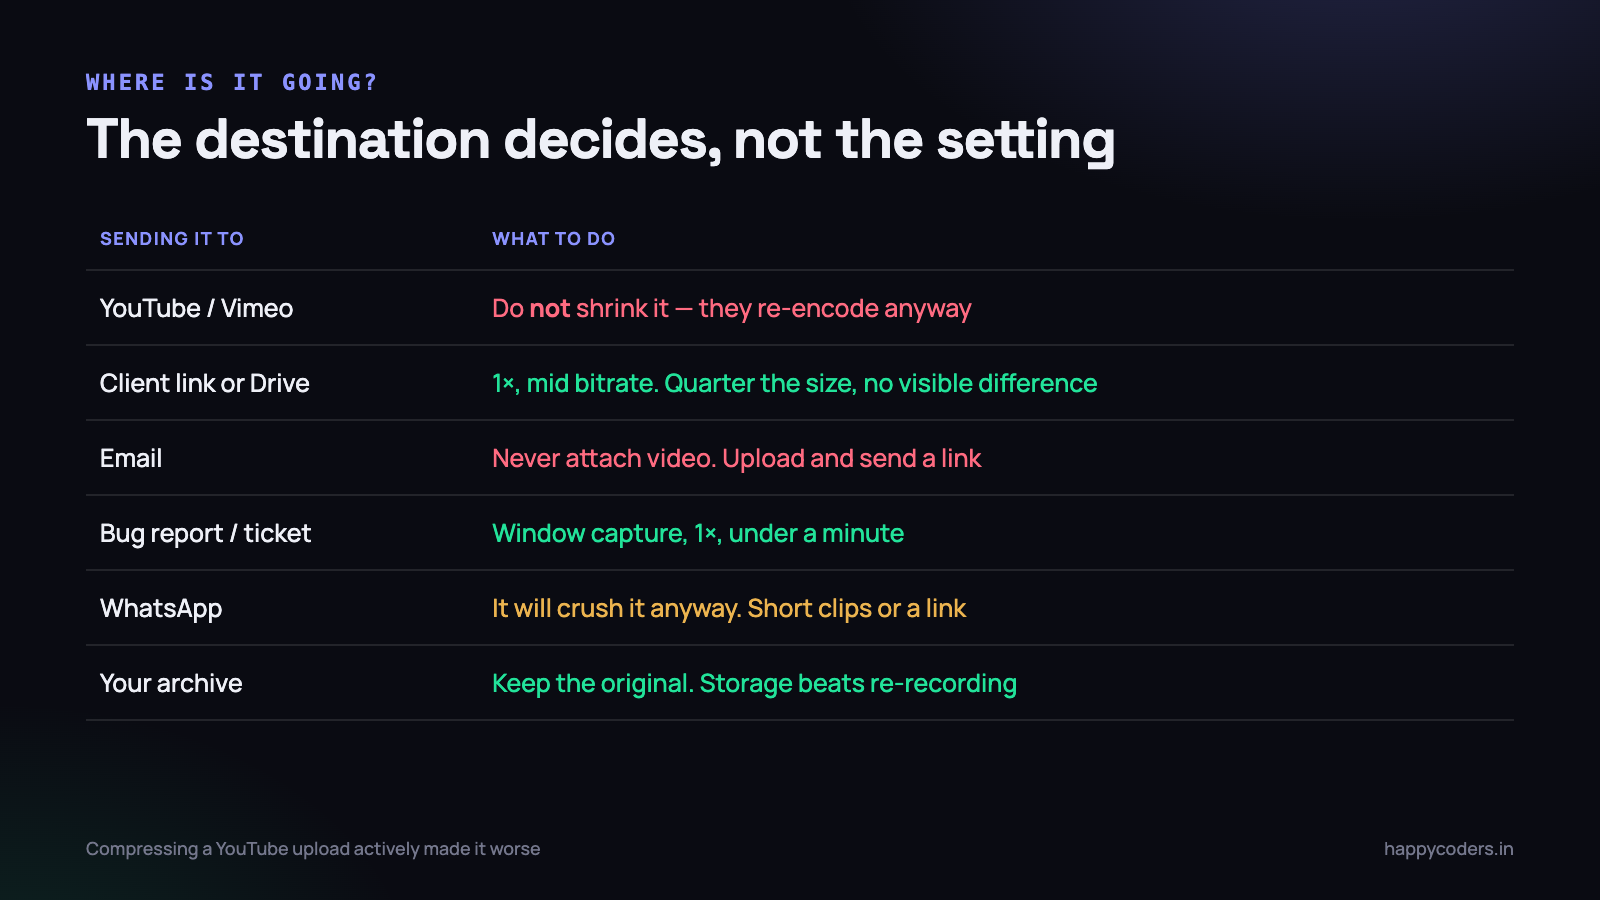
- YouTube or Vimeo — do not shrink it. They re-encode anyway, and a better source gives a better result. Upload the biggest file you have.
- A client link or Drive — 1× resolution, mid bitrate. A quarter of the size, no visible difference in a browser window.
- Email — do not attach video. Most mail systems reject anything over 20 MB. Upload it and send a link.
- A bug report or ticket — window capture, 1×, under a minute. The goal is that it uploads and plays, not that it is beautiful.
- WhatsApp — it will compress it heavily whatever you do. Send short clips, or send a link instead.
- Your own archive — keep the original. Storage is cheaper than re-recording.
Keep the full-quality original of anything you might reuse, and share a smaller copy. Every time you compress an already-compressed file you lose a little more, and small text degrades noticeably by the third generation.
Format: three choices, and only one is usually right
- H.264 in an MP4. Plays everywhere — every browser, every phone, every editor, every ticket system. Larger than the newer codecs and still the right default for anything you send to another person.
- HEVC / H.265. Roughly 30–50% smaller at the same quality, and hardware-encoded on any recent Mac. Excellent for your own archive; risky for a file a client has to open, because it will not play everywhere.
- ProRes. Very large, effectively lossless, and correct only as a source file heading into heavy editing. Never send one to anybody.
For a tutorial going to a student, or a bug report going to a developer, H.264 in an MP4 removes an entire category of “it will not play” replies. The size difference is rarely worth the support conversation.
What about an animated GIF?
It is a common instinct for short clips and it is almost always the wrong one. A GIF of a five-second interaction is frequently larger than the same clip as an MP4, because the format has no real video compression — it stores frames rather than the differences between them. It is also limited to 256 colours, which makes any interface with gradients look banded and dirty.
The only genuine reason to reach for one is a place that will not play video at all. Those are increasingly rare: GitHub, most ticket systems, Slack and every modern chat tool play MP4 inline. Check before assuming.
Two mistakes worth avoiding
- Compressing before checking where it is going. If the destination is YouTube, every minute spent shrinking the file actively made the result worse. Find out first.
- Treating the file size as the only measure. A 9 MB recording where nobody can read the error message has failed at the only job it had. The target is the smallest file that is still useful, which is a different number.
How to test it properly
Compression settings are easy to judge wrongly, because a still page looks fine at almost any quality. Test with the hard cases instead:
- Scroll a long page quickly. The single most revealing test. If text smears or blocks appear, the bitrate is too low.
- Read the smallest text you care about, at the size the viewer will actually watch — not full screen on your own display.
- Watch it on a phone. Detail that survives a 27-inch monitor can vanish on a 6-inch one.
- Check the size against the destination before you finish. A perfect recording that will not upload is not a recording.
The short version
For most people the whole thing reduces to three habits: record the window rather than the whole screen, record at 1× rather than native Retina unless it is going to YouTube, and cut the dead time. Do those and the file is usually small enough that the bitrate question never comes up.
HappyRec is a free screen recorder for macOS with window and area capture and a simple resolution choice rather than a table of numbers — which handles the three levers that matter most, before you have to think about any of the rest.