You record a five-minute walkthrough, narrate it carefully, upload it, and send the link. A good proportion of the people who open it never hear a word you said. They are on a phone in a meeting, or at a desk with no headphones, or scrolling a feed where video autoplays silently by default. What they see is a screen recording with no explanation at all.
Captions fix that, and they cost nothing but time. The tooling to produce them for free has been good for about three years now, and the part that still requires a human — fixing the transcript — takes roughly twice the length of the video. For a five-minute recording that is ten minutes of work, once.
Why captions are not an accessibility extra any more
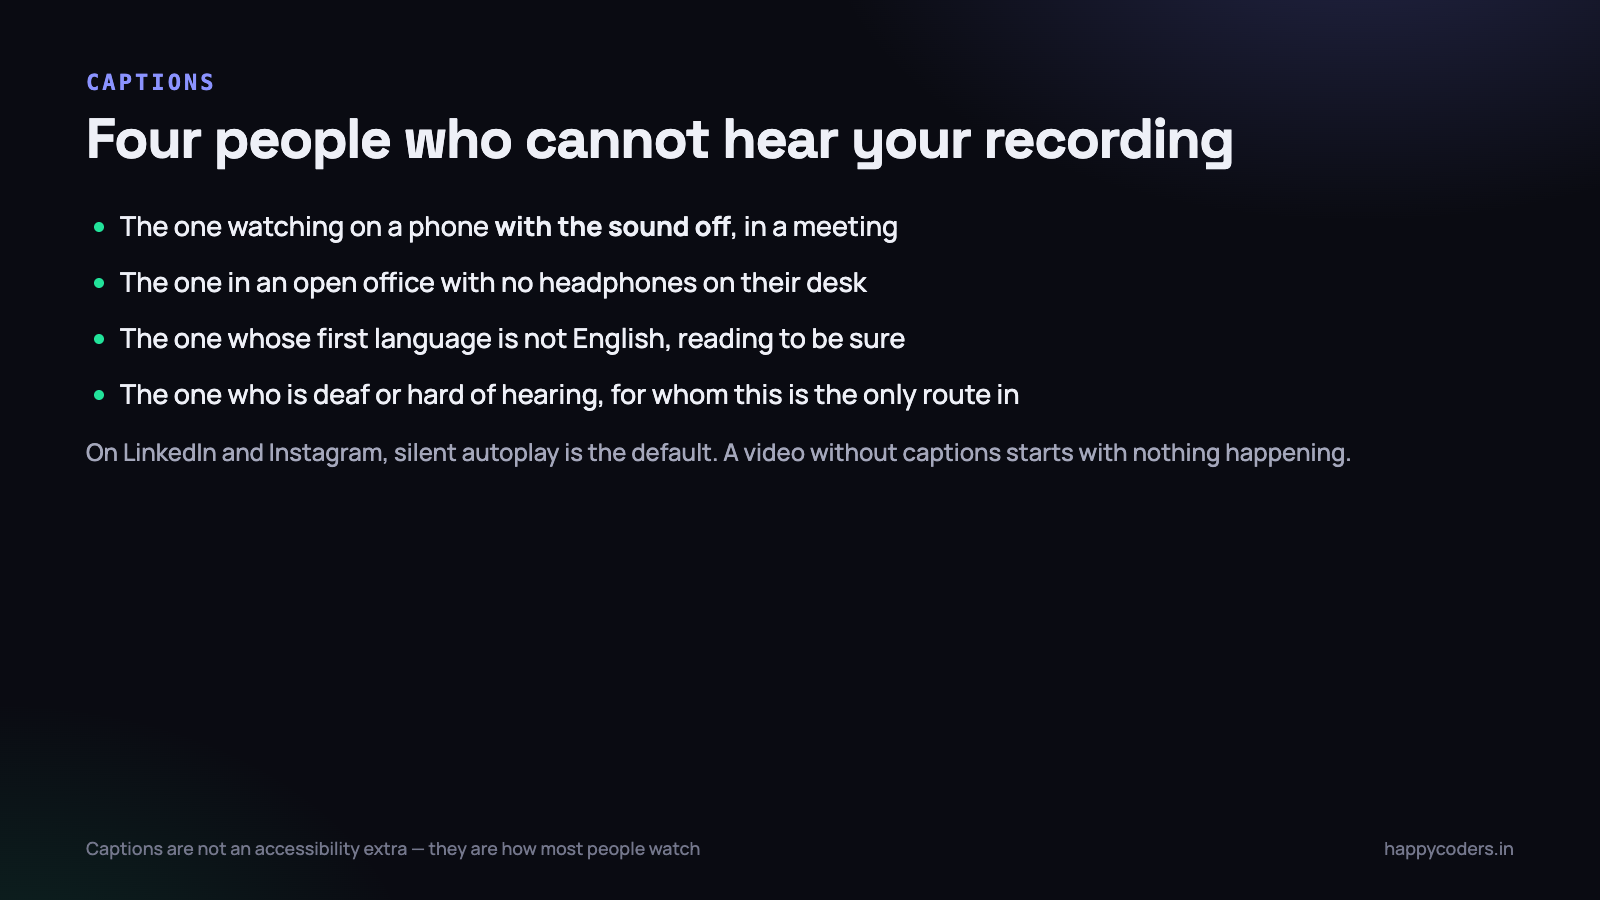
It is worth being precise about who benefits, because the reasons are different and each one changes what you should do.
People watching with the sound off
This is the largest group by a wide margin. On LinkedIn, Instagram and X, video autoplays muted. On a phone in an office, in a train, in a client’s waiting room, the sound stays off. A muted video with no captions has about three seconds to communicate something before the thumb moves on, and a screen recording of a dashboard communicates nothing in three seconds.
People in a noisy room
An open office in Chennai at eleven in the morning is not a listening environment. Neither is a shared cabin with a fan running. Even people who want to hear you frequently cannot, and they are not going to fetch headphones for a video somebody sent them on WhatsApp.
People reading to be certain
This one matters a great deal in Indian teams and with Indian clients, and it is rarely mentioned. English is a second or third language for a lot of your viewers, and accents vary enormously across the country. Someone who understands written English perfectly may only catch seventy per cent of a spoken Coimbatore accent at normal speed. Captions take that from seventy to a hundred, and they do it without anybody having to admit they missed something.
People who are deaf or hard of hearing
For this group, captions are not a convenience. Without them the video does not exist. It costs you ten minutes to include them, and there is no argument on the other side.
There is a selfish reason too. Captions are text, and text is indexable. A captioned video on your own site or on YouTube can be found by somebody searching for a phrase you said out loud. An uncaptioned one cannot.
Burned in, or a file alongside
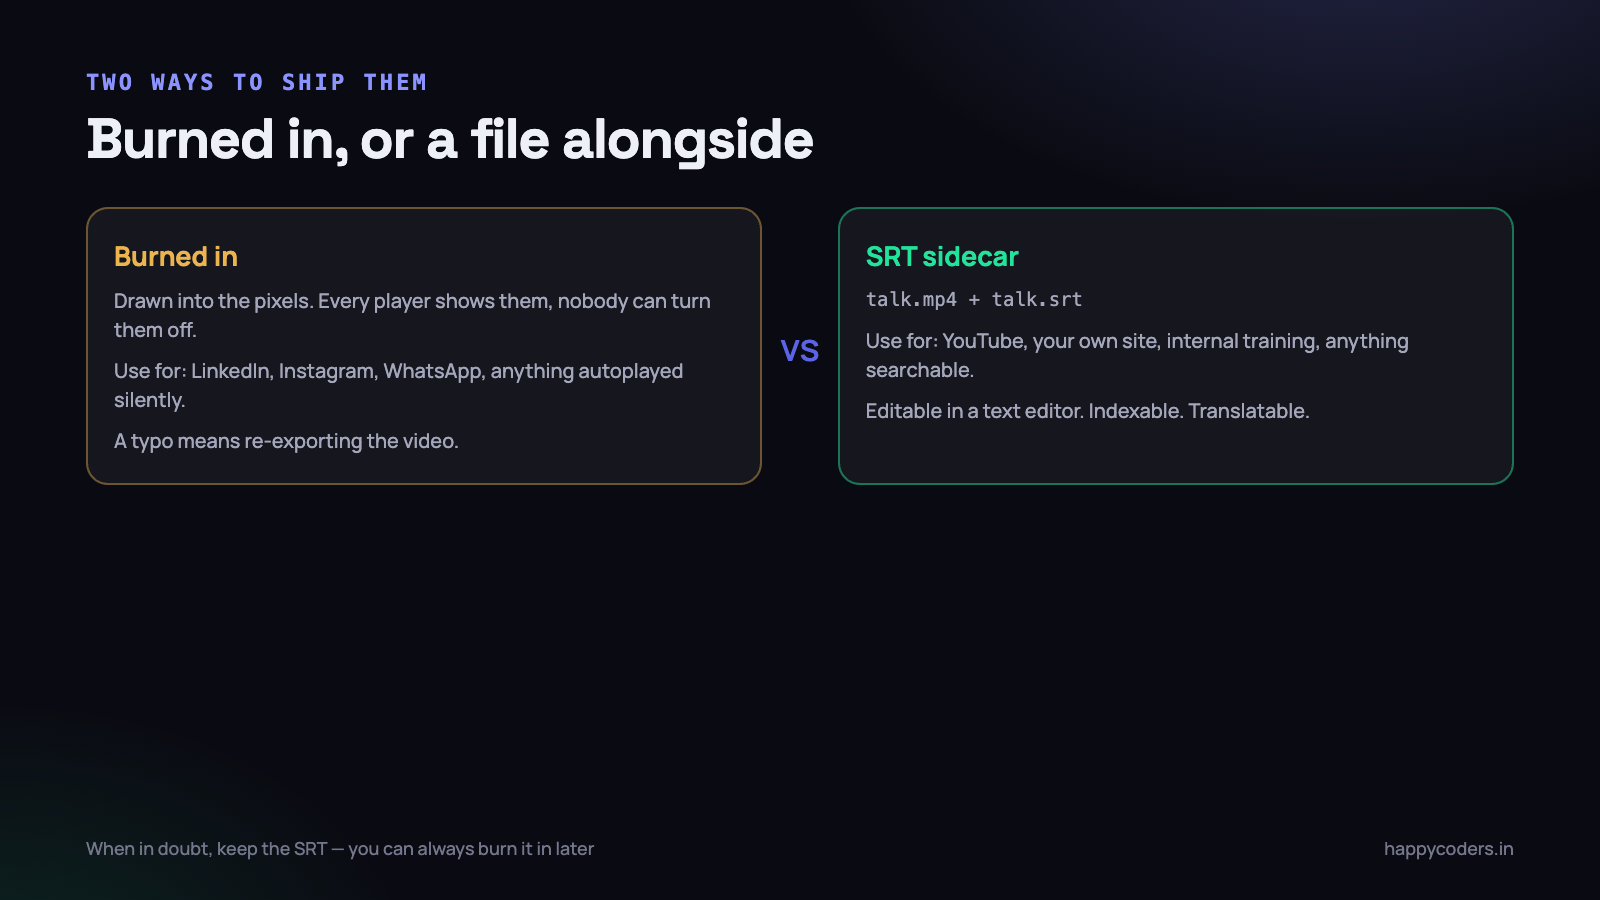
There are two ways to attach captions to a video, and choosing the wrong one wastes an afternoon.
Burned in
The text is drawn into the pixels of the video itself. Every player everywhere shows it, nobody can switch it off, and it survives being downloaded, forwarded and re-uploaded.
Use burned-in captions for social platforms, for anything sent on WhatsApp, and for short clips where you know the viewer will not press a caption button. If your video will autoplay muted in a feed, burned in is the only option that works.
The cost is inflexibility. A typo means exporting the whole video again. The text cannot be translated, resized or searched. And on a small phone screen, captions that were sized for a laptop can cover a third of your interface.
An SRT sidecar
An .srt file sits next to the video — talk.mp4 and talk.srt — and the player draws the text on demand. It is a plain text file you can open in any editor, which means a typo is a five-second fix.
Use an SRT for YouTube, for video on your own website, for internal training material, and for anything a client might want in another language later. The player controls the size, so it respects the viewer’s accessibility settings rather than overriding them.
The format is simple enough to edit by hand, which is worth knowing:
1
00:00:04,120 --> 00:00:07,480
Open the project and click Reports
in the left sidebar.

2
00:00:07,480 --> 00:00:11,900
The date range defaults to this month,
so change it before you export.
An index, a start and end timestamp with a comma before the milliseconds, one or two lines of text, a blank line. That is the whole specification you need.
The free route, start to finish
Nothing here costs money. The sequence matters more than the tools.
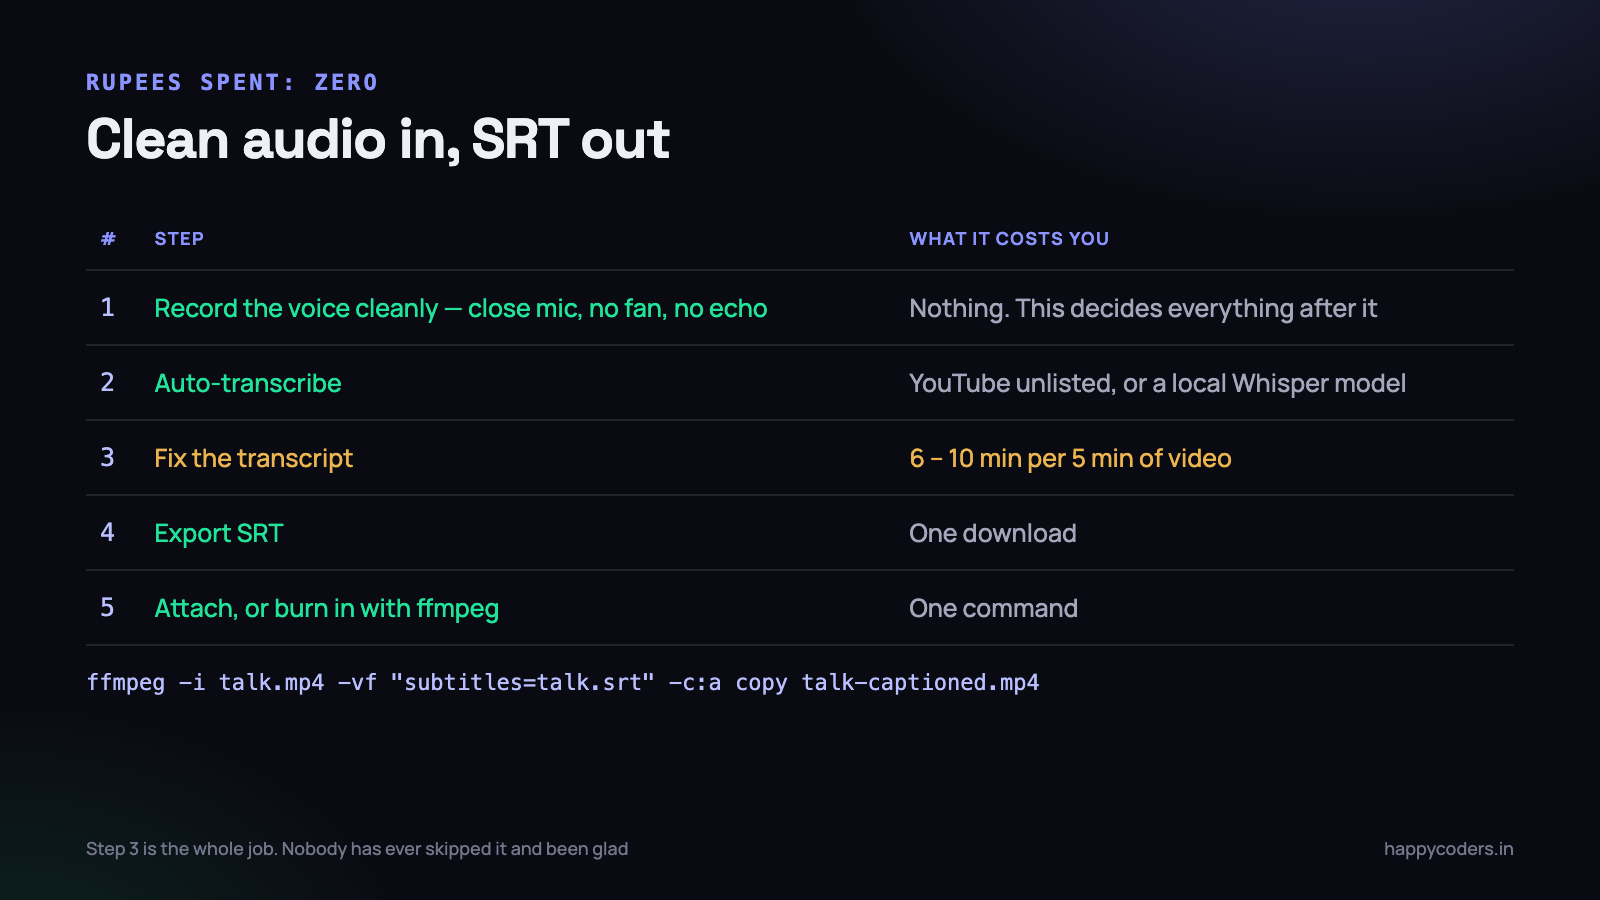
1. Record the audio cleanly
This is the step that decides how much work step three will be, and almost everybody underrates it. Automatic transcription is not fighting your accent nearly as much as it is fighting your room.
- Get close to the microphone. Thirty centimetres from a laptop mic is far better than eighty. Distance is the single biggest factor.
- Turn the fan off for the five minutes you are recording. A ceiling fan adds a constant hiss that transcription models handle badly.
- Avoid the echo. A small room with soft furnishings beats a large tiled one, every time. If your recording sounds hollow to you, it will confuse the model.
- Speak at a steady pace and finish your sentences. Trailing off is where transcripts fall apart.
- Do not record the fan noise of your own laptop by sitting a microphone next to the vents during a long recording.
Ten minutes of care here removes half the transcript corrections later. That trade is always worth taking.
2. Auto-transcribe it
Two free routes, both good.
Upload the video to YouTube as unlisted and wait. YouTube generates a transcript automatically, usually within a few minutes for a short video, and it is genuinely accurate on clear audio. You then edit it in YouTube Studio and download the result as an SRT. No installation, no account beyond a Google login, and the timing is done for you.
Or run a speech model locally. Whisper and its faster derivatives run perfectly well on Apple Silicon, take an audio or video file and output an SRT directly. Nothing leaves your machine, which matters when the recording shows a client’s data. On an M-series Mac a five-minute video transcribes in well under a minute with a medium-sized model.
Pick the local route if the content is confidential. Pick YouTube if it is not, because the editing interface is better than anything you will assemble yourself.
3. Fix the transcript
This is the job. Everything else is a button. Budget six to ten minutes for every five minutes of video the first few times; it gets faster as you learn what your own accent gets wrong.
Work through the whole transcript with the video playing. What you are looking for is covered in the next section, because the errors are extremely predictable.
4. Export the SRT
From YouTube Studio, download the subtitles as SRT. From a local model, you already have one. Keep it next to the video file with the same base name and it will be picked up automatically by most players and upload flows.
5. Attach it, or burn it in
For YouTube, LinkedIn and your own site, upload the SRT. For a burned-in copy, one ffmpeg command does it:
ffmpeg -i talk.mp4 -vf "subtitles=talk.srt:force_style='FontSize=18,MarginV=40'" -c:a copy talk-captioned.mp4Keep both files. The MP4 with burned-in text goes to social, the original plus the SRT goes everywhere else. Produced from one transcript, they cost you one extra minute.
What auto-transcription always gets wrong
After you have corrected a dozen transcripts you stop reading them linearly and start searching for the known failures. They are remarkably consistent.
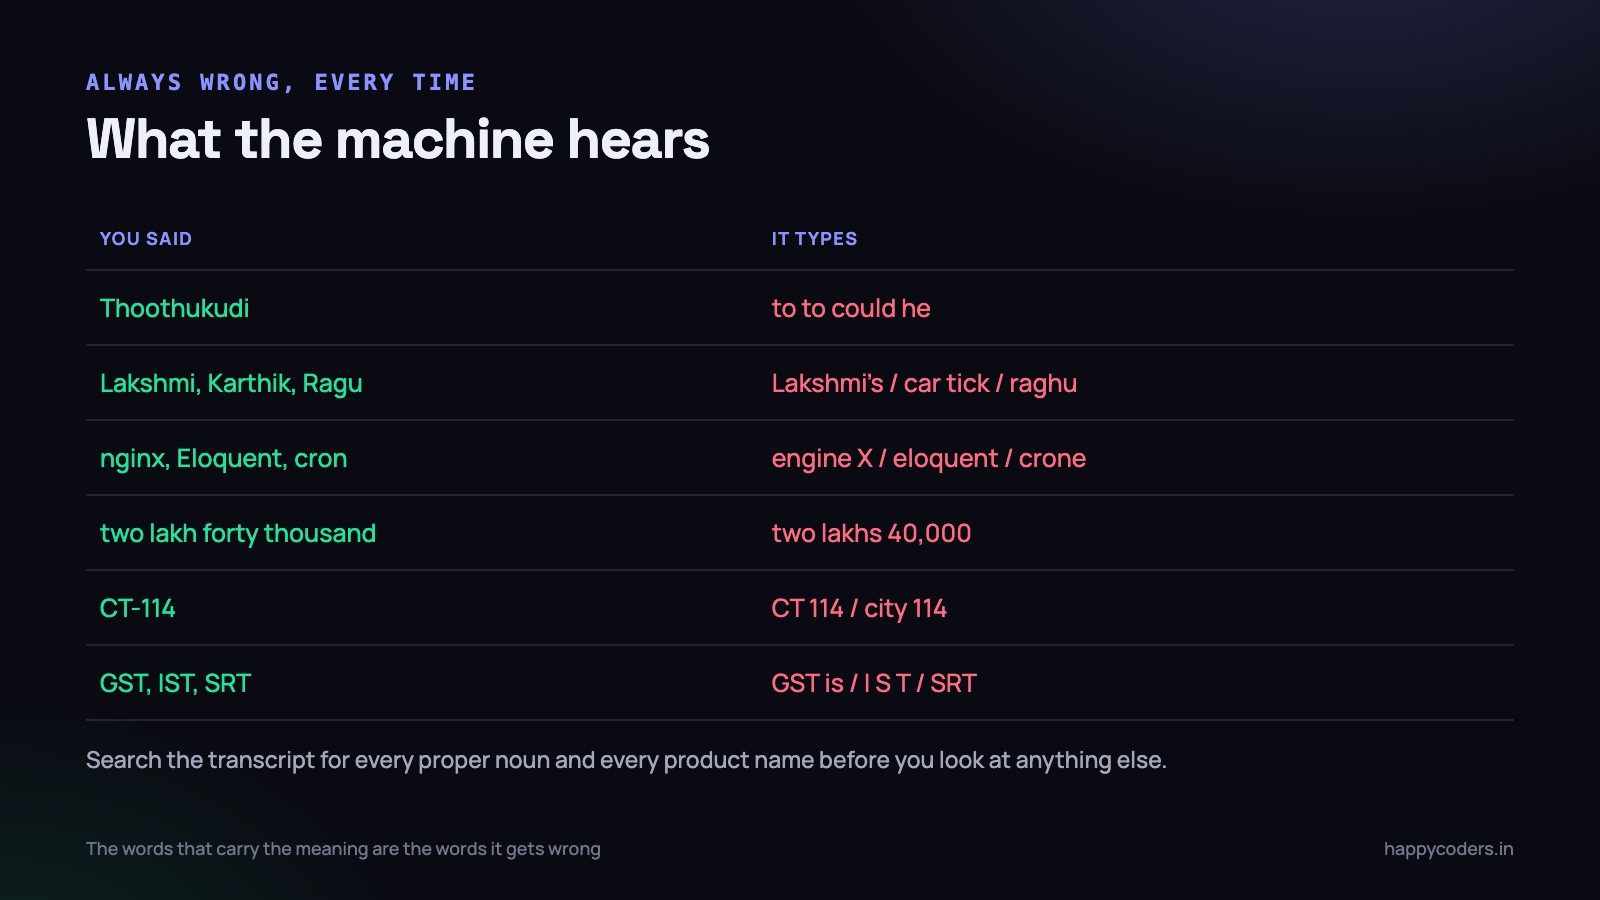
Indian names, every time
Place names and personal names are the worst category by a distance. Thoothukudi, Tirunelveli, Coimbatore, Karaikudi. Karthik, Ragu, Lakshmi, Senthil, Priyadharshini. The model has thin training data for these spoken in an Indian accent, so it substitutes whatever English words are acoustically closest, and the result is often unintentionally comic in a video going to a client.
Correct every single one. If a name appears twelve times, it is wrong in a slightly different way each time, so a blanket find-and-replace does not catch them all.
Technical terms and product names
nginx becomes “engine X”. Eloquent becomes “eloquent” in lower case where it should be a product. cron becomes “crone”. Your own product name, if it is not a dictionary word, will be mangled consistently. Ticket references like CT-114 come out as “CT 114” or worse.
Indian number formats
“Two lakh forty thousand” is transcribed as “two lakhs 40,000” or “2 lakh 40,000” or occasionally as “two lack”. Crore fares no better. Rupee amounts spoken aloud almost never come out in a form you would write down. Decide on one convention — write ₹2,40,000 in the caption — and apply it everywhere.
Acronyms and the words around them
GST, IST, SRT, API, GSTIN. Models tend either to spell them out with spaces or to run them into the next word. “GST is” frequently becomes “GST’s”, which changes the meaning.
Filler and false starts
Auto-transcription is faithful, which is not always what you want. It types every “um”, every “so basically”, and every abandoned half-sentence. Delete them. Captions should be a clean written version of what you meant, not a court transcript. Nobody has ever complained that the captions were tidier than the speech.
Fastest workflow: before reading the transcript at all, search it for every proper noun you know you said — your product name, the client name, the city, each person’s name, each technical term. That catches the errors that actually matter in about two minutes. Then read the rest.
Timing rules that keep captions readable
Correct text with bad timing is still bad captions. Six rules cover almost everything, and they are the same rules broadcast subtitlers have used for decades.
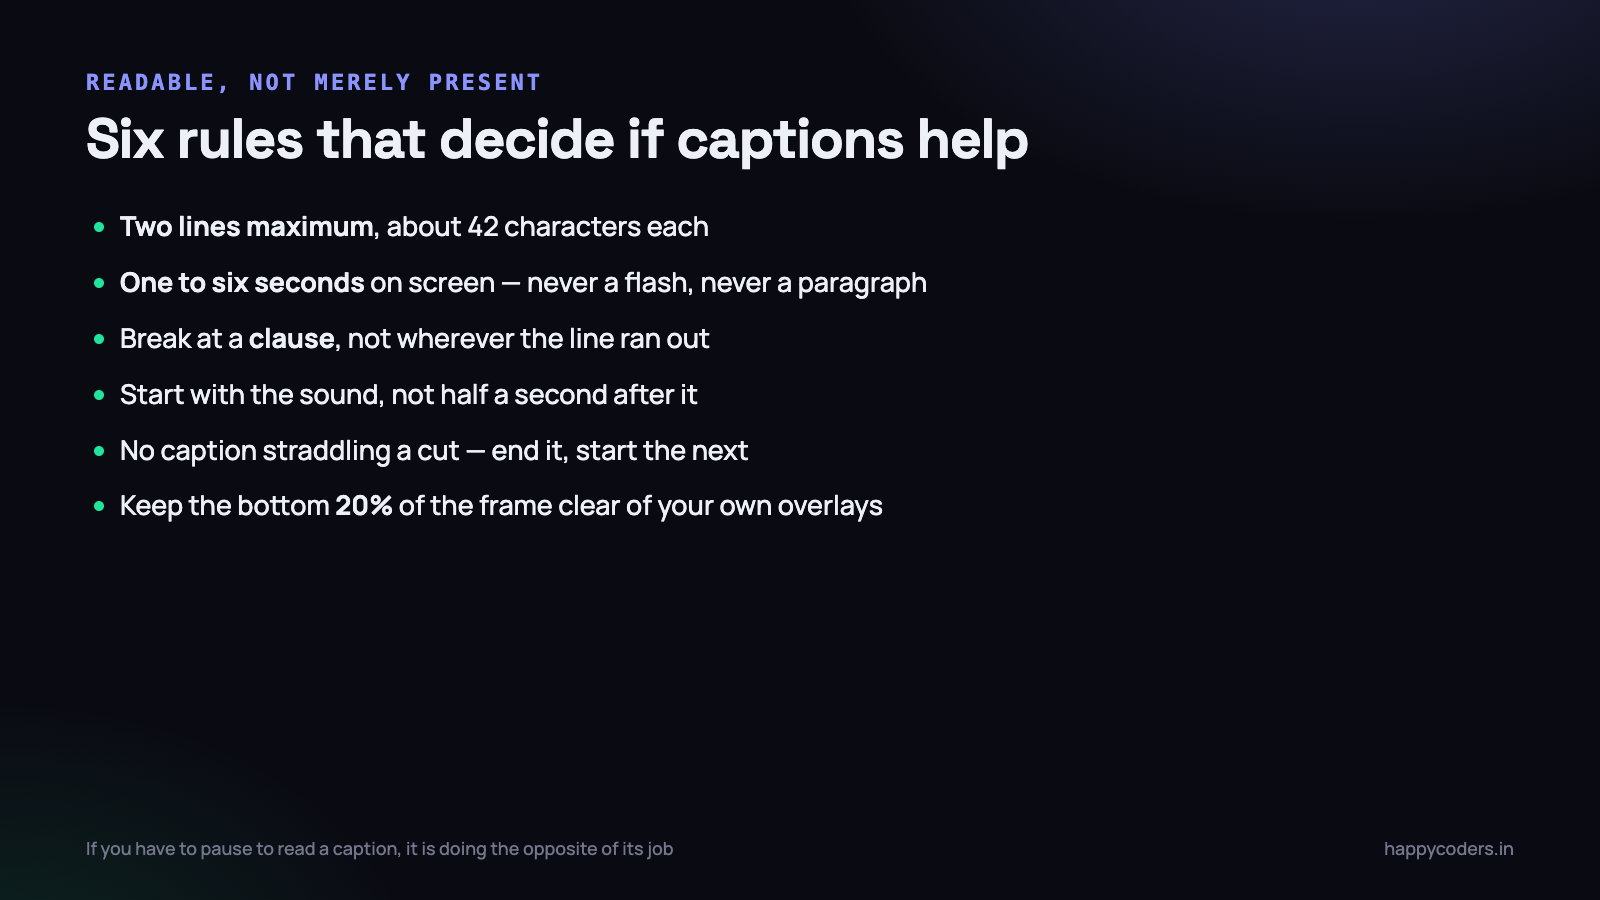
- Two lines maximum, about 42 characters each. Three lines covers too much of the screen and the eye stops tracking the video.
- One to six seconds on screen. Under a second is a flash nobody finishes. Over six is a wall that has stopped matching the audio.
- Break at a clause, not where the line ran out. “Open the project and click” / “Reports in the left sidebar” reads badly. Break after “project”.
- Start with the sound. A caption that appears half a second late feels wrong even to viewers who cannot say why.
- Never let a caption straddle a cut. End it before the cut and start a new one after. Otherwise the text appears to belong to the wrong scene.
- Keep the bottom fifth of the frame clear of your own overlays, logos and interface elements, because that is where captions land.
For screen recordings there is a seventh rule that is specific to this format. Do not let a caption cover the thing you are pointing at. If you are demonstrating a control at the bottom of a page, either move the interface up before recording or shift the caption position for those lines. Viewers will not scrub back to see what was underneath.
Auto-generated timing from YouTube or Whisper is usually close enough to publish. The place it breaks is long pauses, where it stretches one caption across four seconds of silence. Splitting those is the only timing edit most videos need.
Translating them, once they exist
The reason to keep an SRT rather than burning everything in becomes obvious the first time a client asks for the video in another language. A corrected English SRT is a small text file, and translating it into Tamil, Hindi or anything else is a fraction of the work of re-recording the narration.
Two cautions. Machine translation of a technical transcript is usually good enough for comprehension and never good enough to publish unchecked — have somebody who speaks the language read it against the video, which takes ten minutes. And the timings do not always survive, because the same sentence is longer in some languages. If a translated caption runs past six seconds, split it rather than leaving it up.
Upload the translated file as a second caption track rather than making a second video. YouTube and most players handle multiple tracks natively, and the viewer chooses.
Uploading captions to YouTube and LinkedIn
The mechanics differ enough to be worth stating plainly.
YouTube
In YouTube Studio, open the video, go to Subtitles, and either upload your SRT or edit the automatic version in place. Two details are worth knowing.
- Set the language correctly. “English (India)” exists and produces better automatic results than plain English for Indian accents.
- Edited captions beat automatic ones for search. YouTube indexes both, but the automatic track is the one with “to to could he” in it where you said Thoothukudi.
- Chapters are separate from captions and take thirty seconds to add in the description. Do both while you are there.
LinkedIn accepts an SRT at upload time only. Choose the video, and before posting, open the video settings and attach the caption file. If you post first and then want captions, you have to delete the post and upload again — there is no way to add them afterwards, and the file must be named with the language code, for example talk-en.srt.
Because LinkedIn autoplays muted in the feed, this is also the platform where burned-in captions earn their keep. For a short clip under a minute, burn them in and attach the SRT as well. For a longer video, the SRT is enough.
Your own website
If you host the file yourself, an HTML5 video element takes a track element pointing at a WebVTT file, which is an SRT with a header line and full stops instead of commas in the timestamps. Most tools export both formats; if yours does not, the conversion is a one-line ffmpeg command.
This is the same principle that applies to a recorded lesson or a tutorial — the transcript makes the video findable. If you are publishing to YouTube regularly, the setup side is covered in our note on recording a YouTube video on a Mac for free.
What to do on Monday morning
Pick the video you have already sent to the most people, and caption that one. Do not start with a new recording.
- Upload it to YouTube as unlisted and wait a few minutes for the automatic transcript.
- Search the transcript for every proper noun you said — names, places, product names, ticket references. Fix them first.
- Read the rest against the video and delete the fillers. Ten minutes for a five-minute video.
- Split any caption longer than six seconds and fix the clause breaks while you are there.
- Download the SRT and keep it beside the video file, same base name.
- Burn a copy with ffmpeg for anything going to LinkedIn or WhatsApp.
- Watch thirty seconds of it on your phone with the sound off. If you can follow what is happening, it is done.
That last check is the real test, and it takes half a minute. If the video still makes sense with no audio at all, the captions are doing their job — and that is how most of the people you send it to are going to watch it anyway.
HappyRec is a free screen recorder for macOS that captures your voice and system audio on separate paths, which is exactly what you want before transcribing — clean narration, with the interface sounds kept out of the way.